Logic: Customize Your Form's Flow
Pro Plan Only
Our advanced logic features let you create dynamic forms that change based on respondents' answers. This guide will help you understand and use these features to make your form more dynamic and user-friendly.
Available Logic Features
- Skip this page: Skip a specific page if certain conditions are met. This option is only valid for pages after the first one (e.g., page 2, page 3, etc.).
- Jump to: Jump to a specific page based on respondents' answers.
- Finish and show: End the form and display a custom "Thank You" page.
- Redirect to: Redirect respondents to a specific URL.
Steps to Implement Logic
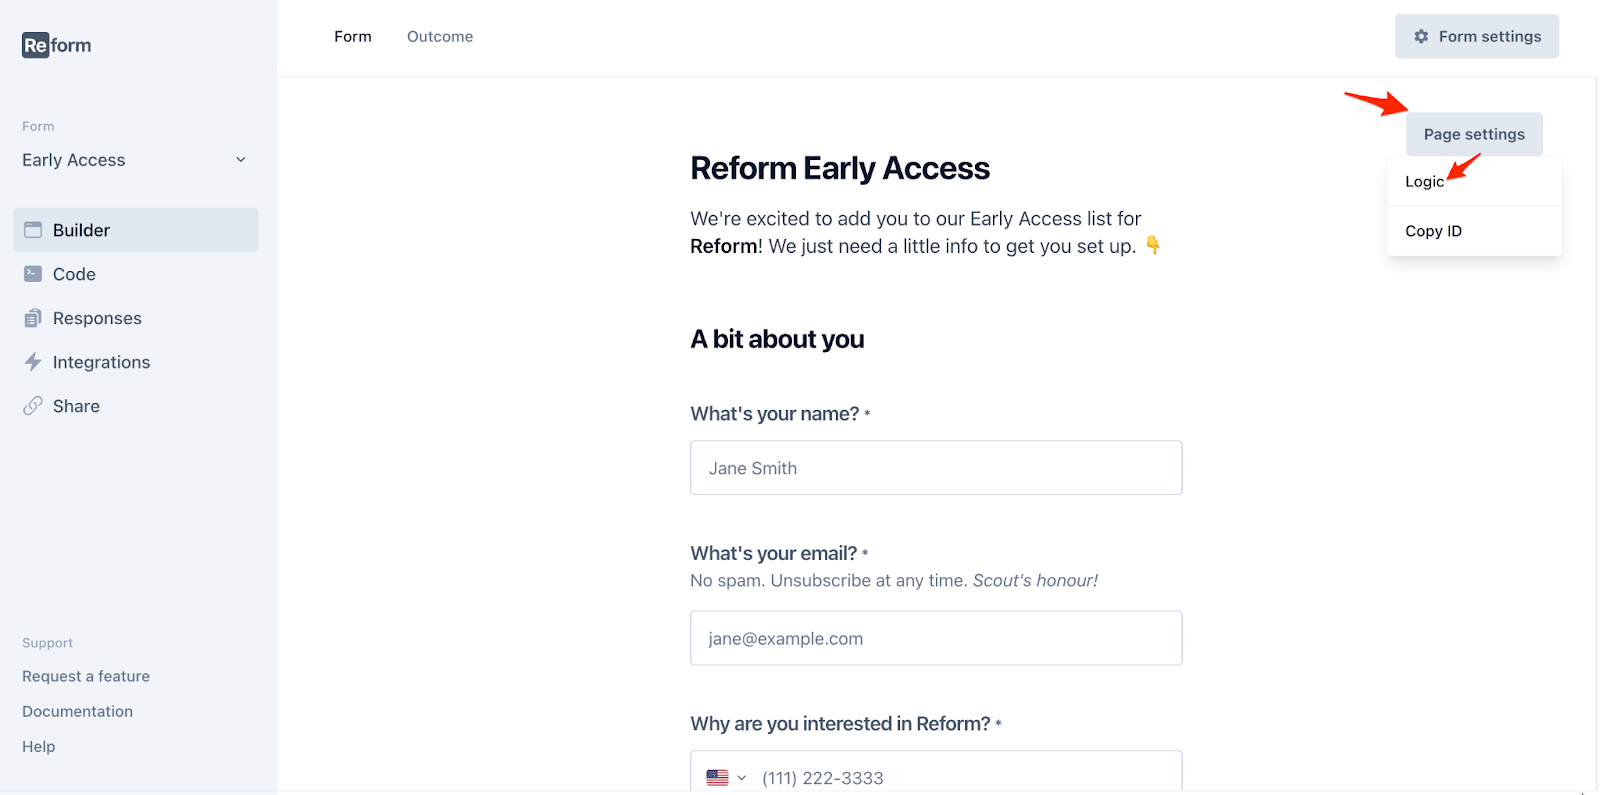
- Open the Form: Open the form you want to add logic to.
- Access Page Settings: Locate the "Page settings" button on the right side of each step.
- Navigate to Logic Settings: Click on "Logic" from the menu that appears.
Setting Up Logic
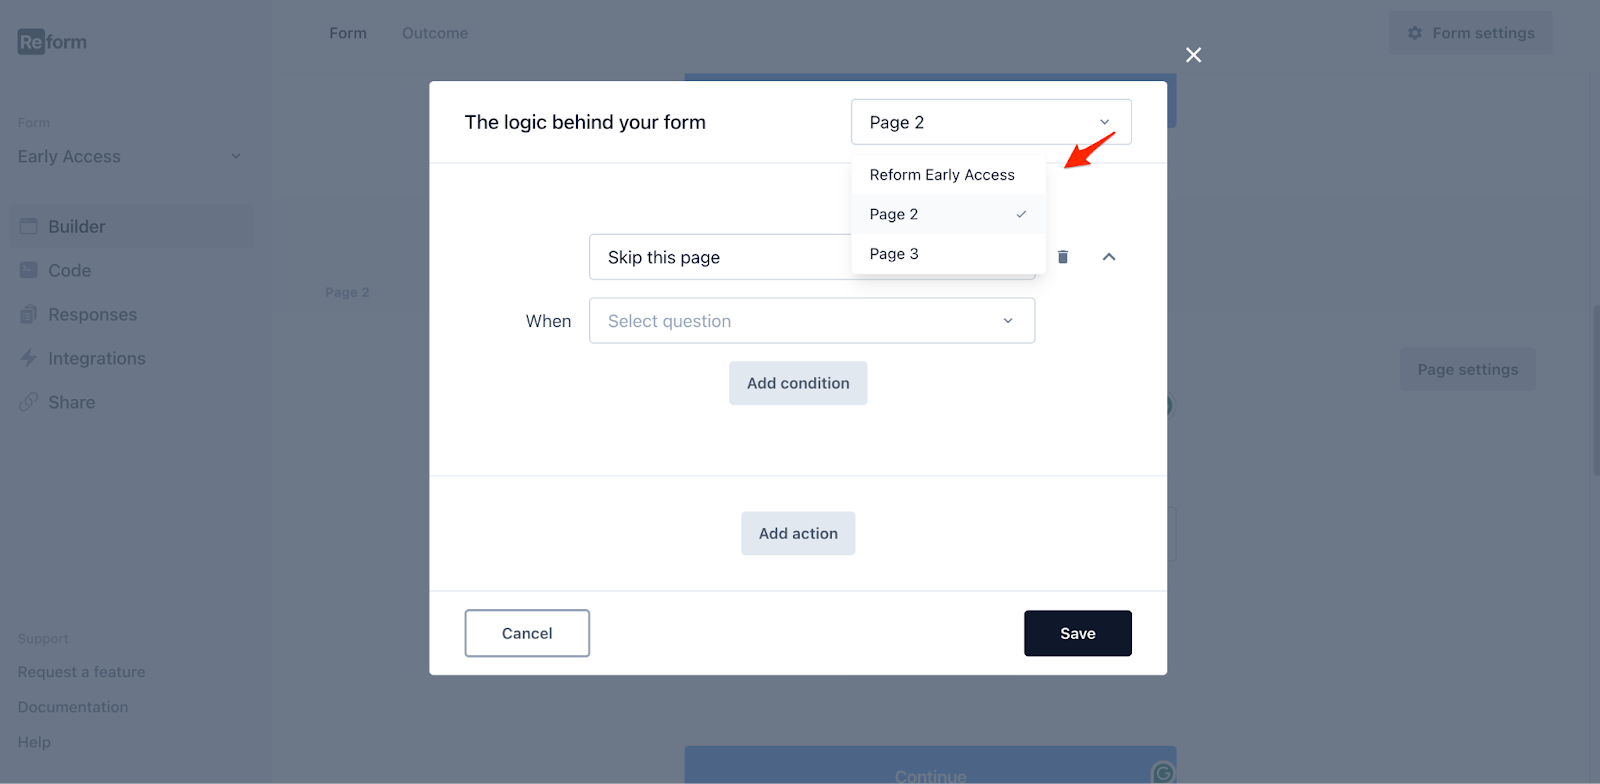
Choosing the Page for Logic
At the top of the logic overlay, select the page (step) to which you want to apply the logic from the dropdown menu next to "The logic behind your form".
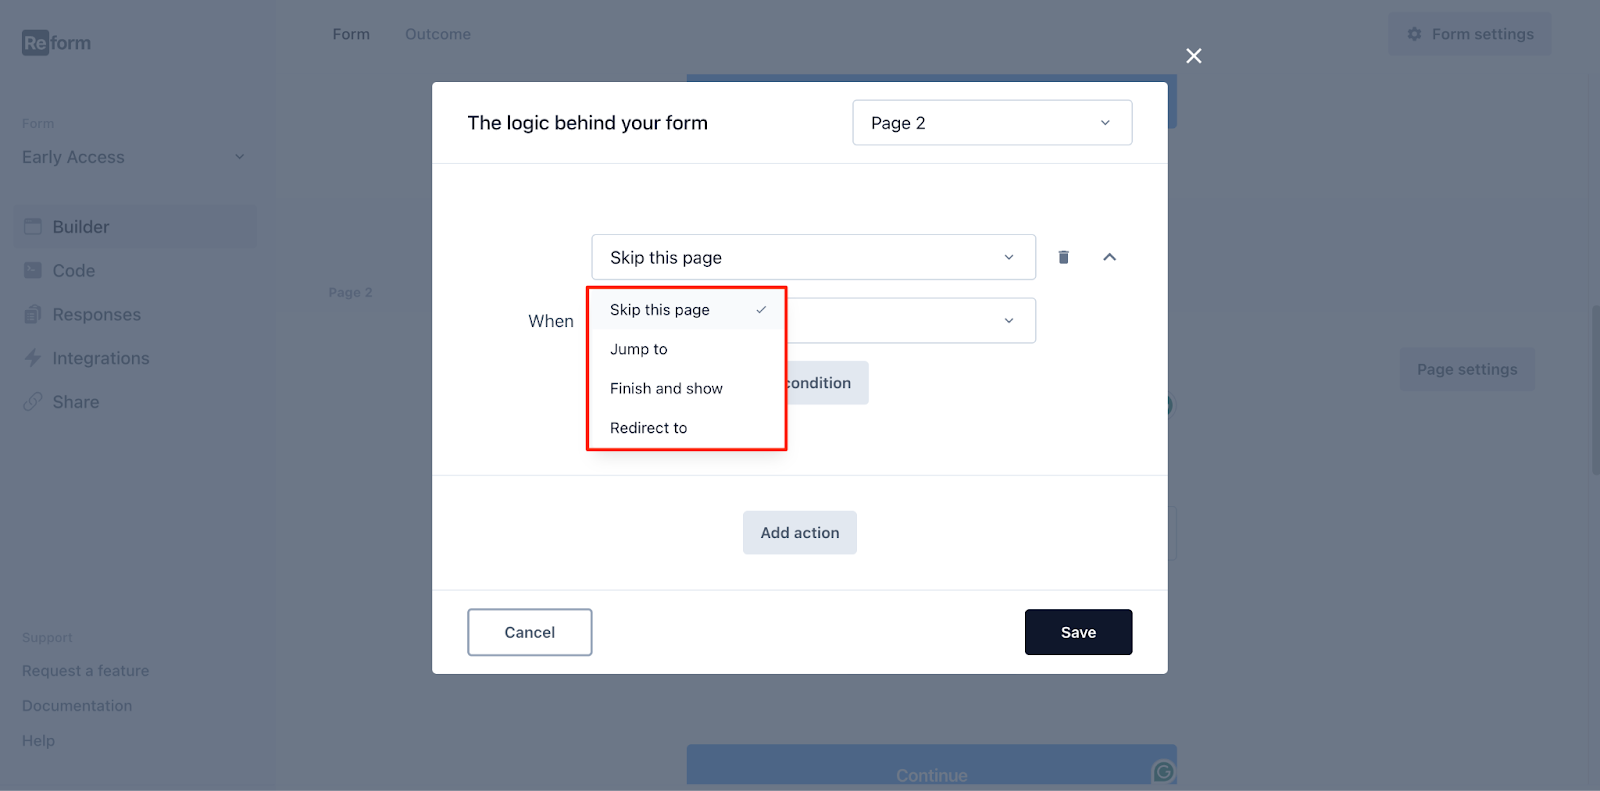
Selecting the Logic Type
From the first dropdown, choose the type of logic you want to use: Skip this page, Jump to, Finish and show, or Redirect to.
Detailed Logic Setup
Skip this Page
- Select "Skip this page" from the first dropdown.
- Define the Condition:
- Choose the question that will trigger the skip from the "When" dropdown.
- Select the condition (e.g., "is", "is not", "is empty", "is not empty").
- Enter the value that will activate the skip.
Jump to
- Select "Jump to" from the first dropdown.
- Choose Destination Page (step):
- Select the page (step) respondents will jump to if conditions are met.
- Define the Condition:
- Choose the triggering question from the "When" dropdown.
- Select the condition (e.g., "is", "is not", "is empty", "is not empty").
- Enter the value that will activate the jump.
Finish and Show
- Select "Finish and show" from the first dropdown.
- Choose the "Thank You" Page:
- Select the specific "Thank You" page to show. You can create and show different thank you pages based on various answers.
- Define the Condition:
- Choose the triggering question and set the condition.
Redirect to
- Select "Redirect to" from the first dropdown.
- Enter the URL:
- Enter the URL to which respondents will be redirected.
- Define the Condition:
- Choose the triggering question and set the condition.
Adding Multiple Conditions and Actions (Optional)
Add More Conditions:
The "Add condition" feature allows you to create complex and detailed logic rules by combining multiple criteria for the same logic action. This enables your form to respond accurately to various respondent inputs, ensuring a tailored and relevant experience. Here’s how you can effectively use the "Add condition" feature:
How to Add Conditions:
- Set the Initial Condition: For example, if you’re using the "Skip this page" logic, your initial condition might be "Skip this page when 'Are you a VIP?' 'is' 'Yes'".
- Add More Conditions:
- Click on the "Add condition" button located below the existing condition fields.
- A new condition field will appear, allowing you to specify an additional criteria.
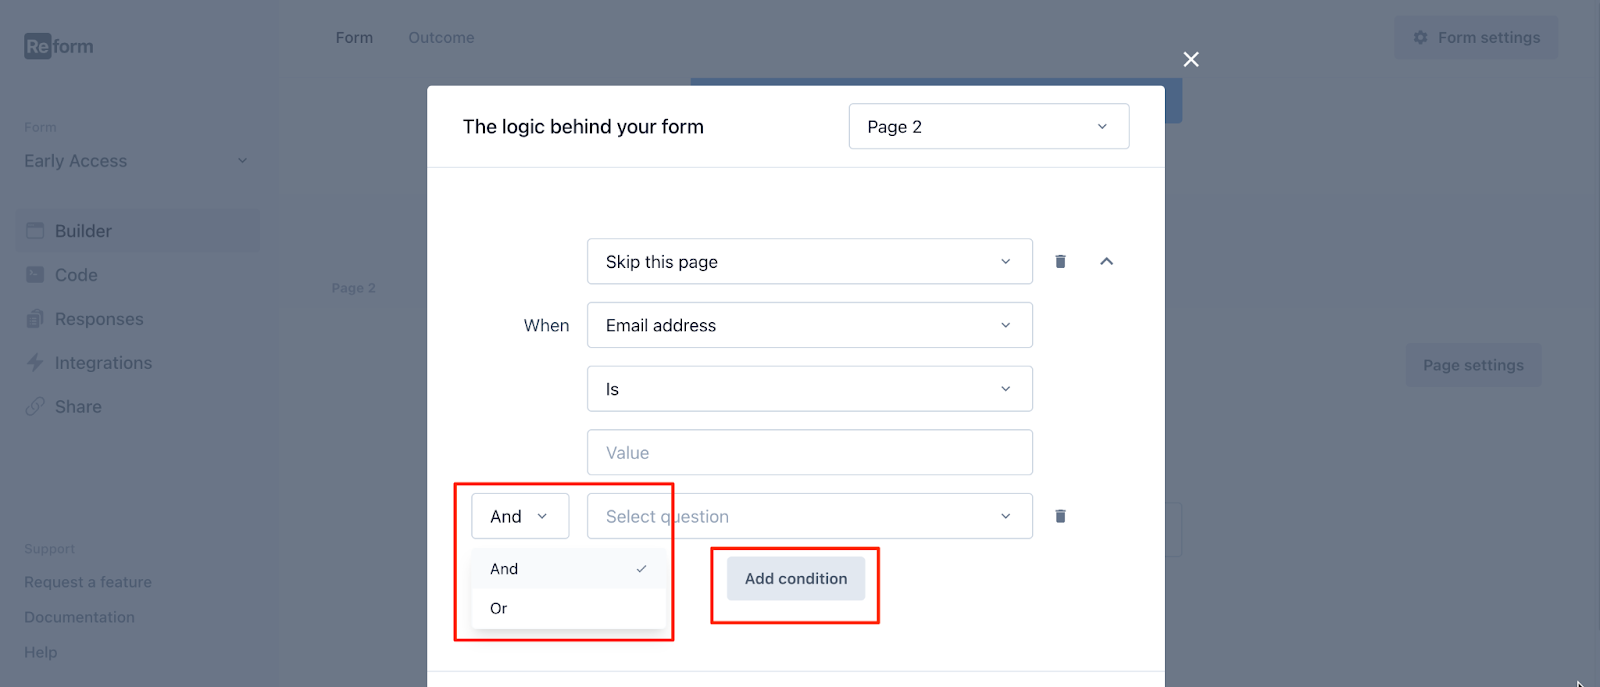
- Choose Condition Type (And/Or):
- On the left side of the newly added condition, select either "And" or "Or" from the dropdown menu.
- And: All conditions must be met for the logic action to execute.
- Or: Any one of the conditions being met will trigger the logic action.
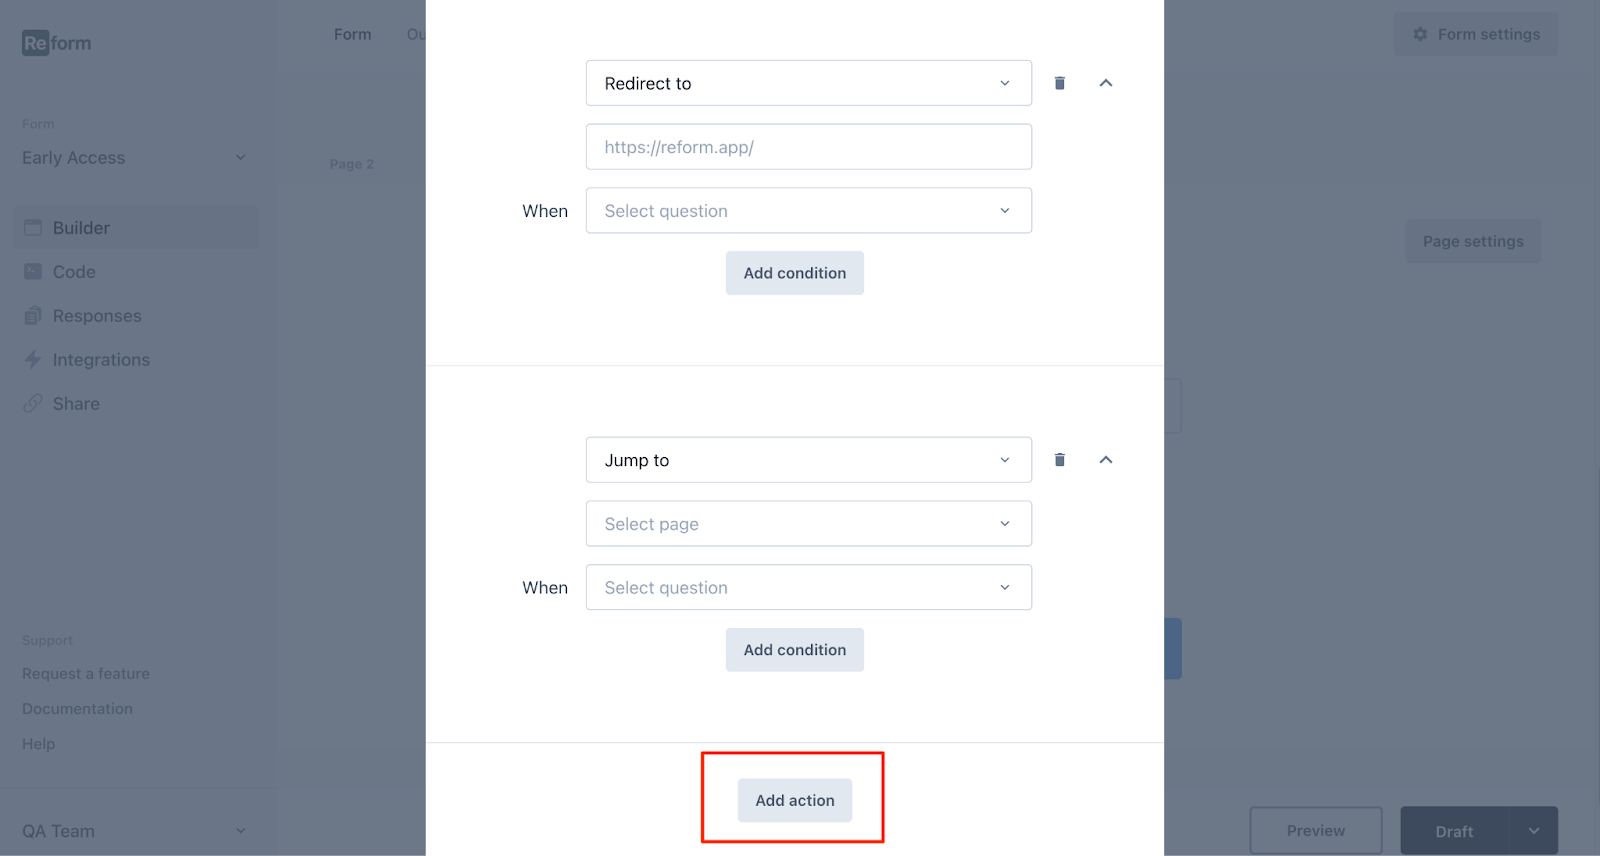
How to Add Another Action:
The "Add action" feature allows you to create multiple logic rules for the same page (step) in your form. This flexibility enables you to apply different logic types based on different questions and conditions within the same step.
- Click "Add Action": After setting up your first logic rule, click the "Add action" button located below the existing logic setup fields.
- Create a Separate Logic Rule:
- First Logic Rule: For instance, you can set a "Redirect to" logic that sends respondents to a specific URL if they answer a particular question in a certain way.
- Second Logic Rule: Then, you can add another logic rule, such as "Jump to", which will navigate respondents to a different page if they answer another question differently.
Finalizing the Logic
- After setting up the logic, click "Save" at the bottom right corner.
- Repeat the process for other pages as needed.
Examples:
Example Scenario for the “Skip this page” logic:
You have a form for event registration.
- Logic: Skip the payment page if the attendee is a VIP.
- Setup: "Skip this page" when "Are you a VIP?" "is" "Yes".

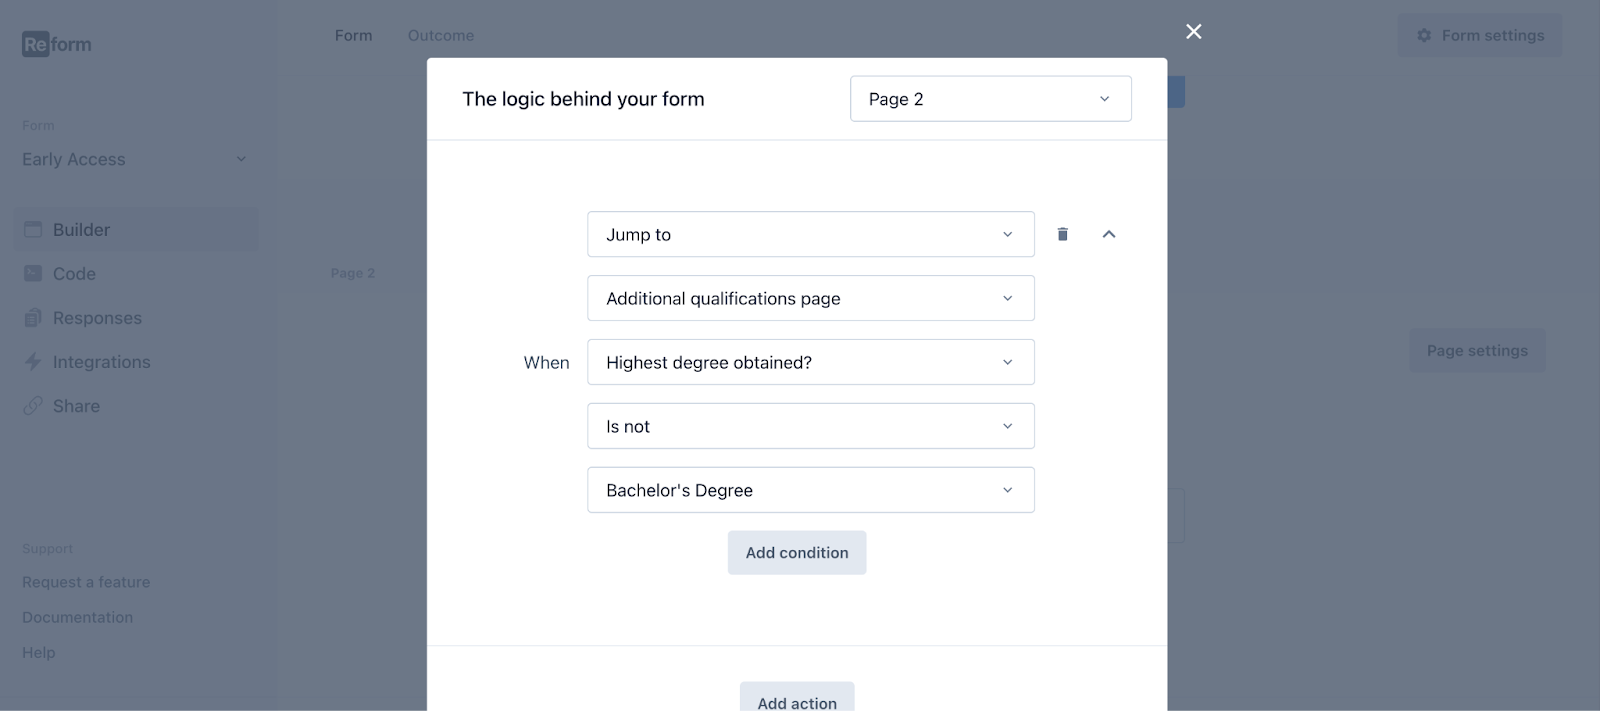
Example Scenario for the “Jump to” logic:
A job application form.
- Logic: Jump to the additional qualifications page if the user did not select "Bachelor's Degree".
- Setup: "Jump to" "Additional Qualifications Page" when "Highest degree obtained?" "is not" "Bachelor's Degree".
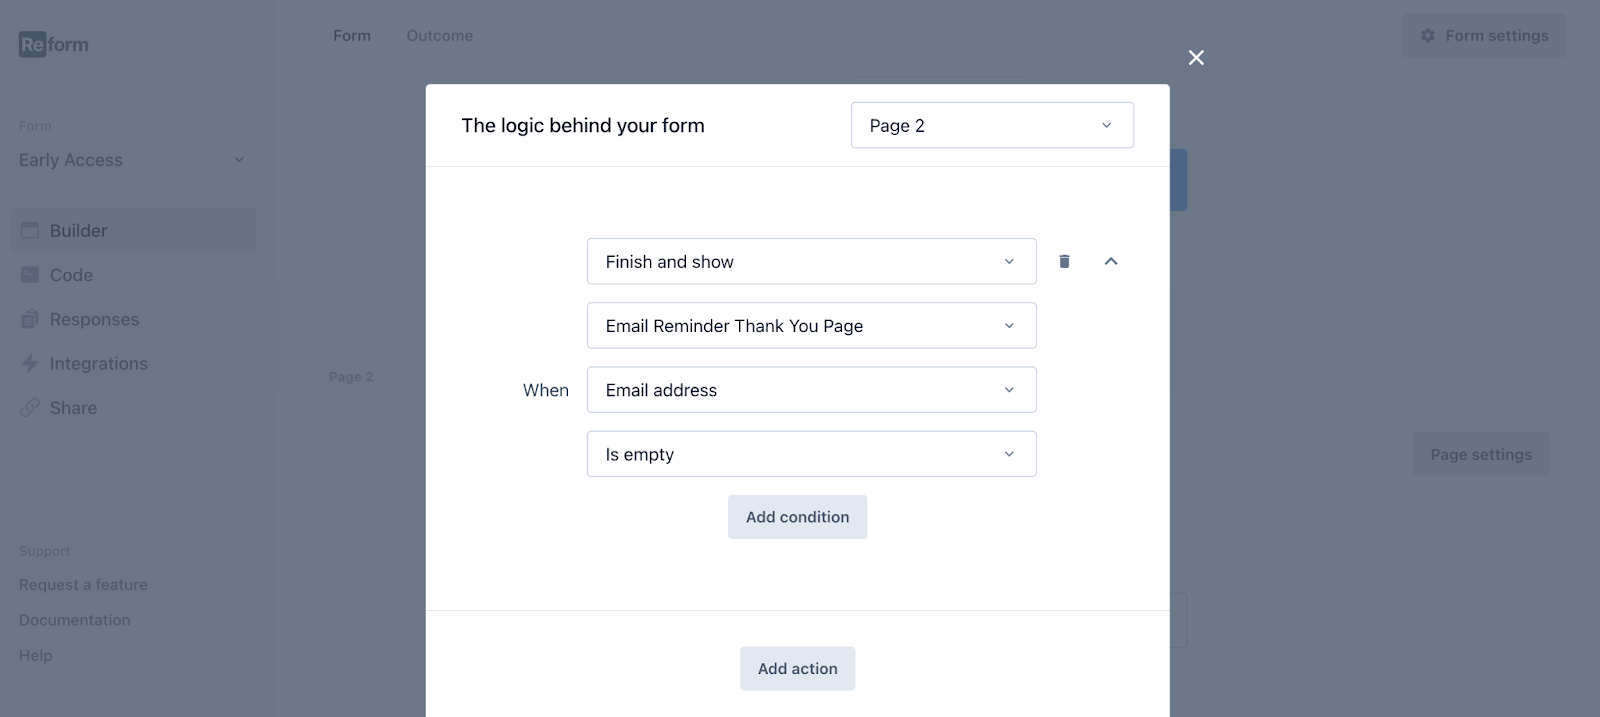
Example Scenario for the “Finish and show” logic:
A newsletter subscription form.
- Logic: Show a thank you page prompting the user to fill in the email if it was left empty.
- Setup: "Finish and show" "Email Reminder Thank You Page" when "Email address" "is empty".
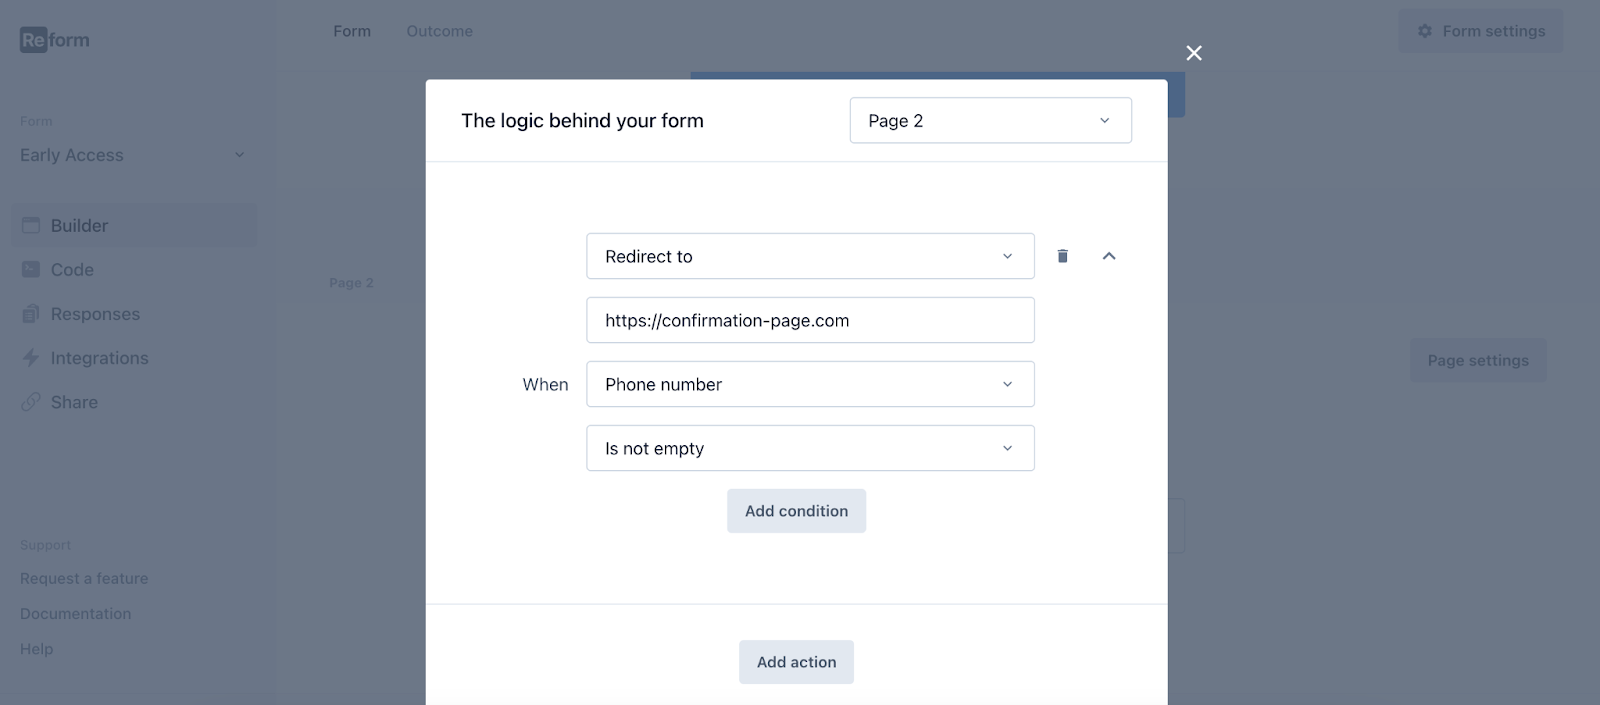
Example Scenario for the “Redirect to” logic:
A contact form.
- Logic: Redirect to a confirmation page if the phone number is provided.
- Setup: "Redirect to" a confirmation page when "Phone number" "is not empty".
Example Scenarios for additional conditions:
Scenario 1: Combining Conditions with "And"
- Logic Feature: Skip this page
- Scenario: A form for a special offer.
- Initial Condition: "Skip this page" when "Are you a member?" "is" "No".
- Additional Condition: "And" "Do you have a promo code?" "is" "No".
- Logic: Skip the offer details page if the respondent is not a member and does not have a promo code.

Scenario 2: Combining Conditions with "Or"
- Logic Feature: Redirect to
- Scenario: A form for product recommendations.
- Initial Condition: "Redirect to" "https://www.reform.app/ " when "Interested in premium products?" "is" "No".
- Additional Condition: "Or" "Budget" "is empty".
- Logic: Redirect to the basic products page if the respondent is not interested in premium products or the budget field was left empty.

Example Scenario for the “Add action” feature:
Imagine you have a multi-step form collecting detailed information from respondents. On Step 2 of the form, you want to set up different actions based on the respondents' answers:
- First Logic Rule (Redirect to):
- Action: Redirect to a URL.
- When: "Are you a member?" "is" "Yes".
- URL: https://dashboard.reform.app/forms
- Second Logic Rule (Jump to):
- Action: Jump to a specific page.
- When: "LinkedIn profile URL" "is empty".
- Page: Page 4 (LinkedIn Profile Details).

Using these logic features can significantly enhance the user experience of your forms. By dynamically adjusting the flow based on respondents' answers, you can create more personalized and efficient forms. Feel free to experiment with different logic setups to find what works best for your needs.
If you're experiencing issues or have questions, please contact us at [email protected]. We're here to assist you!